For a nice tomato salad you don’t need always red tomatoes.
The recipe for this tomato salad is just a coincidence. Last time we went for shopping, I stood in front of a shelf with tomatoes in all shapes and colors. Right after the thought how great the tomatoes look, the thought came that I should make some nice salad from it.
In addition to a great tomato photo, what I posted already yesterday on Facebook, I made this colorful salad. The aim to me was to make not something unusual or complicated, it is a very simple and delicious tomato salad. The taste of the summer, simple and also can be made with ordinary red tomatoes. So grab some tasty tomatoes and enjoy.
As ground I took a HORI vinyl stone tile, which was kindly provided by casando.de.
Alle mit einem Sternchen* oder Amazon Logo gekennzeichneten Links werden als Werbelinks (Affiliate-Links) bezeichnet. Wenn Sie also dort klicken und einkaufen, geht eine kleine Provision an uns, welche Ihren Preis natürlich nicht ändert. Mehr erfahren Sie hier.
The spinach salad with strawberry & Vinegar is fruity and delicious!
The Spinach salad with strawberry & vinegar had a longer backround. On the Eat & Style Fair 2014 I could try the delicious vinegars from Fruchtwerker for the first time and I’m blown away. They have a great acidity and the full flavor of the fruit, theoretically you could drink it directly. Whether you make a salad dressing, a dessert or whatever, the fruit vinegar from Fruchtwerker fits always.
I made, for example, during last years christmas season some delicious cookies with honey & vinegar. The recipe can be found here.
Who wants to watch what for varieties they have to offer, you can check the Fruchtwerker website. There you can also ask where to buy this great vinegar near you. It’s worth it!
This post was created in collaboration with Fruchtwerker. But these is my personal opinion, which was not affected by Fruchtwerker.
Spinach salad with strawberry & vinegar {advertising}
Nice, fruits summer salad!
Menüfolge
Salad, Side Dish
Zubereitungszeit15Minuten
Gesamtzeit15Minuten
Portionen2Portions
Zutaten
75gBaby Spinach
100gStrawberries
1Pcs.Avocado
30gHazelnuts- sliced
3Tbsp.Strawberry Vinegar- e.g. Fruchtwerker "Erdbeer & Essig"
1 ½Tsp.Mustard
4Tbsp.olive oil
Salt
Pepper
Zubereitung
Wash and spin dry the spinach. Also clean, wash and drain well the strawberries. The avocado cut in half, remove the core and dissolve the flesh from the shell.
Cut the flesh of the avocado and strawberries into pieces. Roast the hazelnuts in a frying pan until golden brown.
Mix in a bowl Strawberry Vinegar and mustard, beat the olive oil slowly in. Season the vinaigrette with salt and pepper.
Rhubarb Ketchup, don’t need to be sweet everytime.
Today I made Rhubarb ketchup, because you don’t need to make only cake or jam from the rhubarb. This year I made some extraordinary recipes out of rhubarb. Today I start with this ketchup.
The preparation is very simple, just cook everything together and blend it. Then you only need to season it, and that’s it. In the first moment it tastes a bit like a jam, but when you season it nicely with salt, pepper and vinegar, the savory taste will come out great.
This creative dip fits perfectly to meat on your next BBQ or to the next Burger your create.
As ground I took HORI laminate, which was kindly provided by casando.de.
The colorful pasta with melted tomatoes fits perfectly on a beautiful summer day.
Finally this a weekend with nice weather and the colorful pasta with melted tomatoes fits perfectly. This course is once again quite simple and also works with any other pasta. I got the pasta as a present and therefore I used the colorful pasta.
The colorful pasta I have been given, among other things, as a birthday present. My friends follow the recipes and photos on my blog and wanted to contribute and be part of a recipe. So I’ve come up with a simple pasta recipe, which fits perfectly on a hot summer day. Add to that a glass of white wine or a great beer and the evening is perfect.
As ground I took HORI Laminat, which was kindly provided by casando.de.
For all chocolate fans I have today a recipe for Brownie waffles with icing sugar.
With the Brownie waffles with icing sugar I present you today the waffle recipe of the month April.
Who like to do a special waffle, not the same standard recipe every time, must try this delicious recipe. This waffles are something different but not to exotic. They are so chocolaty and taste the best still warm from the waffle iron.
So grab your waffle iron and enjoy.
This year I made until now the following waffles recipes for you:
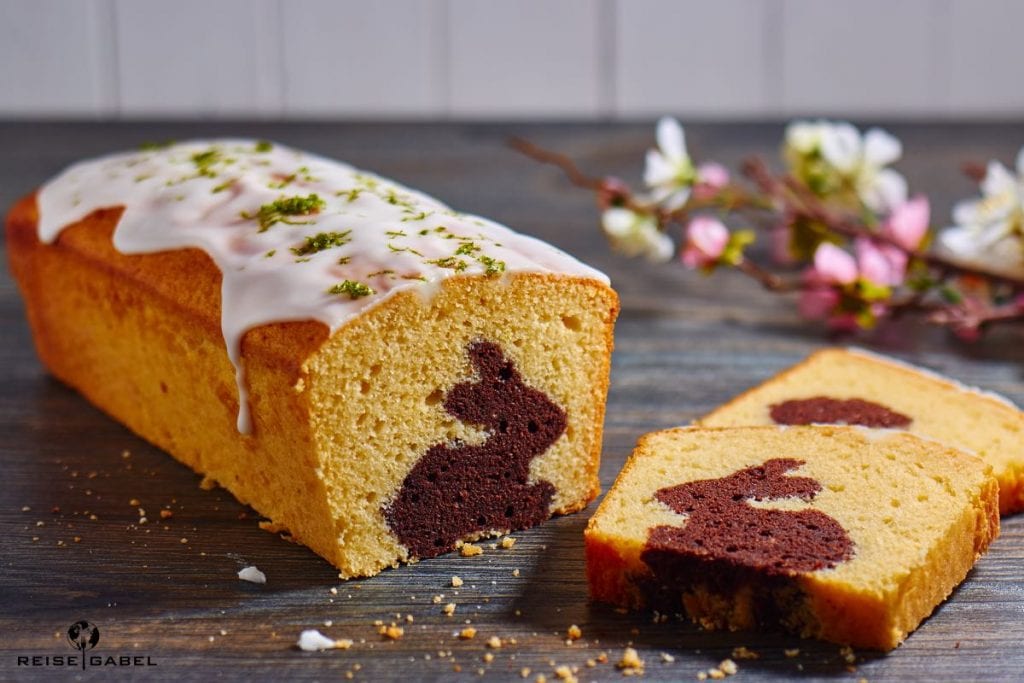
With this recipe for the lime cake with Easter bunny, I made my own version of a cake with a pattern.
I have often seen cakes with a pattern in the middle, such as a star at Christmas, but never made one in black and white. Last year I baked a chocolate cake for Easter and hid a „carrot“ in it.
This year at Easter, there is the classic version in black and white. The bunny is made of chocolate dough and the light dough is seasoned with lime.As decoration, I make a lime glaze and a put bit of lime zest on top, finished is the delicious and fresh Easter cake.
A fruity sponge cake with perfect Easter decoration.
Zubereitungszeit30Minuten
Kochzeit1Stunde
Gesamtzeit4Stunden30Minuten
Portionen10Slices
Zutaten
Fot the bunnies:
75gButter
50gSugar
1PinchSalt
1Pcs.Egg
100gFlour
1tsp.Baking Powder
20gCocoa Powder
50mlMilk
For the Limedough:
1Pcs.Lime
125gButter
125gSugar
1PinchSalt
3Pcs.Eggs
225gFlour
15gBaking Powder
100gYoghurt
For the Glace:
100gIcing Sugar
1Pcs.Lime
Zubereitung
Bunnies:
Beat the butter, sugar and salt until creamy.
Stir in egg. Mix the flour, baking powder and cocoa and stir with the milk under the butter-egg mixture.
Lay out a baking sheet with baking paper. Then build a border with aluminum foil, which gets a rectangle of about 14 x 20 cm.
Add the dough, smooth and bake in the preheated oven at 175° C for about 15 minutes. Remove and allow to cool.
Cut the rabbits out of the dough with a cookie cutter and set aside.
Limedough:
Wash the lime and rub the skin. Halve the lime and squeeze out the juice.
Stir butter, sugar, salt, lime zest and juice until creamy. Stir in the eggs one after the other.
Mix flour and baking powder and stir it into the butter-egg mmixture with the yoghurt.
Place the rabbit in the center of a greased and floured, box shaped baking tin (11 x 25 cm). Carefully fill in the dough on the sides. Spread the dough over the bunnies so that you can not see it anymore.
Bake the cake in preheated oven at 175° C for approximately 40 minutes. Remove and allow to cool on a wire rack for about 20 minutes. Carefully remove the cake from the tin and let it cool completely.
Finishing:
Wash the lime and rub off the skin. Halve the lime and squeeze out the juice.
Mix icing sugar with about 1 tbsp lime juice. Spread the icing on the cake and spread the lime peel over it.
Set the cake aside for about 30 minutes to allow the glaze to set.
Werbung
Newsletter
Hier gehts zum kostenlosen Reisegabel Newsletter. Damit verpasst Ihr keinen Beitrag und kein Rezept mehr.
Alle mit einem Sternchen* oder Amazon Logo gekennzeichneten Links werden als Werbelinks (Affiliate-Links) bezeichnet. Wenn Sie also dort klicken und einkaufen, geht eine kleine Provision an uns, welche Ihren Preis natürlich nicht ändert. Mehr erfahren Sie hier.
Alle mit einem Sternchen* oder Amazon Logo gekennzeichneten Links werden als Werbelinks (Affiliate-Links) bezeichnet. Wenn Sie also dort klicken und einkaufen, geht eine kleine Provision an uns, welche Ihren Preis natürlich nicht ändert. Mehr erfahren Sie hier.