Plaited yeast loaf with rhubarb and oatmeal crumble

Plaited yeast loaf with rhubarb and oatmeal crumble

Plaited yeast loaf with rhubarb and oatmeal crumble


Such a plaited yeast loaf with rhubarb is in the warm weather just delicious. Another advantage is that you get rid of the last rhubarb that may still be in the fridge. But we still have it after the rhubarb season, because we always have a stock of it in the freezer. So you can also make the rest of the summer great rhubarb pies and dishes. For example, for the next barbecue a delicious rhubarb BBQ sauce.

Plaited yeast loaf with rhubarb and oatmeal crumble

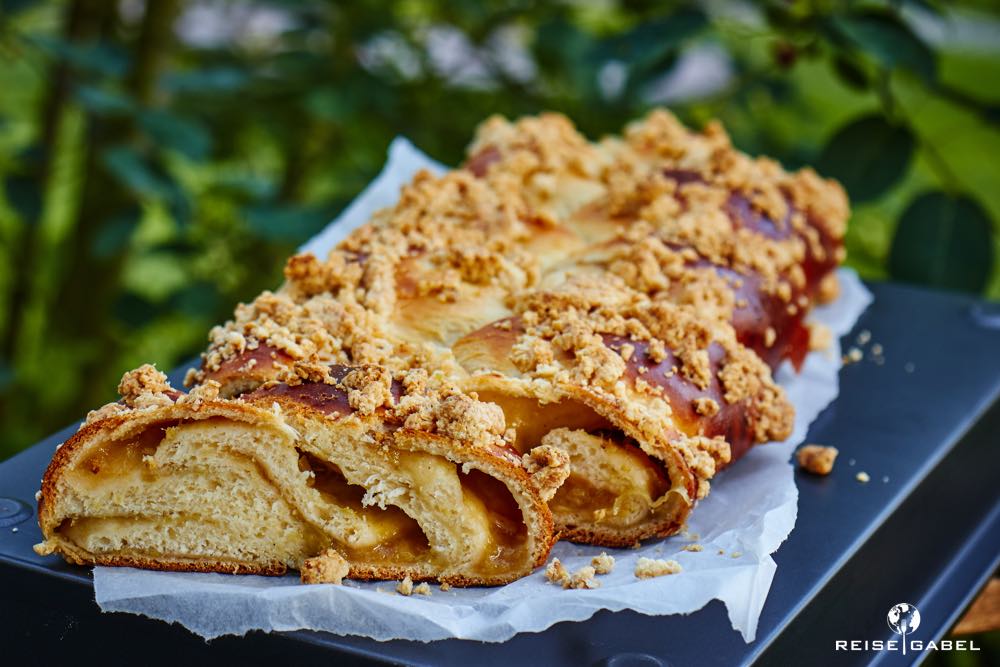
For the recipe, you can either cook as described a delicious compote, or you still have the leftovers from the rhubarb syrup. You can also use it very well for that. No matter what is taken, it’s just a delicious „cake“.


Plaited yeast loaf with rhubarb and oatmeal crumble

Zubereitungszeit 45 Minuten
Kochzeit 1 Stunde
Gesamtzeit 3 Stunden
Portionen 20 Slices

Zutaten

For the Compote:

  • 500 g Rhubarb
  • 100 g Sugar
  • 1/2 Pcs. Vanilla pod
  • 1 Pinch Salt
  • Cornstarch

For the Yeast Dough:

  • 150 ml Milk
  • 20 g Yeast fresh
  • 400 g Flour
  • 50 g Butter soft
  • 50 g Sugar
  • 1/2 tsp. Salt
  • 1 Pcs. Egg

For the Crumble:

  • 35 g Butter soft
  • 20 g brown Sugar
  • 20 g Oatmeal
  • 55 g Flour

For brushing:

  • 1 Pcs. Egg yolk
  • 1 tbsp. Milk

Zubereitung

Compote:

  1. Clean the rhubarb and cut into small slices. Put all the ingredients, except the cornstarch, in a pot and bring to a boil.

  2. When the rhubarb boils, reduce the temperature and simmer until it is quite soft. Stir frequently.

  3. Stir some cornstarch with water and thicken the compote.

  4. Remove the compote from the heat and let it cool.

Yeast dough:

  1. Heat the milk lukewarm in a small saucepan, add the yeast and stir until it has dissolved.

  2. Put flour, butter, sugar, salt and the egg in a mixing bowl. Add the yeast milk and mix with the dough hooks at slow speed. Then knead at the highest speed into a dough until it releases from the bowl (about 8 minutes).

  3. Cover the bowl with a towel and leave the dough in a warm place for about 30 minutes.

Crumble:

  1. Knead all ingredients in a small bowl to crumble.

Finishing:

  1. Briefly knead the dough and roll out on the floured work surface to a rectangle of approx. 30 x 60 cm.

  2. Spread the compote on the dough and cut the dough into three strips. Roll them up starting from the long side. Plait the three rolls.

  3. Place the dough on a baking tray covered with baking paper, cover with a towle and let it rest for about 15 minutes.

  4. Brush the loaf with the yolk-milk-mixture, spread the crumbles on it and bake in a preheated oven at 175°C for approx. 30-35 minutes. Remove and allow to cool.

Werbung

Newsletter

Hier gehts zum kostenlosen Reisegabel Newsletter. Damit verpasst Ihr keinen Beitrag und kein Rezept mehr.

Werbung

Affiliate Links

Alle mit einem Sternchen* oder Amazon Logo gekennzeichneten Links werden als Werbelinks (Affiliate-Links) bezeichnet. Wenn Sie also dort klicken und einkaufen, geht eine kleine Provision an uns, welche Ihren Preis natürlich nicht ändert. Mehr erfahren Sie hier.

[jetpack-related-posts]

Jam from Juneberry

Jam from Juneberry

Jam from Juneberry


The recipe today is a little bit more special, because you can not buy the juneberry so easy. One or the other may have seen this shrub in the garden and seen the fruits. We also became aware after a few years, that the fruits are edible. My parents have the juneberry in the garden for a long time, but so far only the birds have eaten it.

Jam from Juneberry

The picking is a bit difficult because the fruits are not all ripe at the same time and you have to look carefully. In addition, the juneberries are only as big as blueberries. But it’s worth it, if they would stand in the garden anyway and fall off. You just have to see if the birds have discovered the shrub, then you should quickly protect the fruits with a net, otherwise nothing is left.

Jam from Juneberry

The juneberrie belongs to the pome fruit plants. The seeds contain hydrocyanic acid, so you should not eat them raw. It is easy to get gastrointestinal discomfort from eating large quantities of raw juneberries or chewed seeds. But processed as jam you get no problems with it.


Jam from Juneberry

Zubereitungszeit 15 Minuten
Kochzeit 20 Minuten
Gesamtzeit 35 Minuten

Zutaten

  • 1 kg Juneberry
  • 1 Pcs. Lemon
  • 750 g Sugar

Zubereitung

  1. Wash the Juneberries and remove all the stems. Halve the lemon and squeeze out the juice.

  2. Put lemon juice, juneberries and sugar in a saucepan and mix. Bring to a boil.

  3. Purée with a blender, it may be still a bit lumpy.

  4. Now boil for about 20 minutes while stirring constantly. Then test and see if the jam gets firm. If necessary, continue cooking.

  5. Now put in well-cleaned glasses, close with a lid and let cool.

Werbung

Newsletter

Hier gehts zum kostenlosen Reisegabel Newsletter. Damit verpasst Ihr keinen Beitrag und kein Rezept mehr.

Werbung

Affiliate Links

Alle mit einem Sternchen* oder Amazon Logo gekennzeichneten Links werden als Werbelinks (Affiliate-Links) bezeichnet. Wenn Sie also dort klicken und einkaufen, geht eine kleine Provision an uns, welche Ihren Preis natürlich nicht ändert. Mehr erfahren Sie hier.

[jetpack-related-posts]

Rhubarb syrup

Rhubarb syrup

Rhubarb syrup for cocktails or lemonade.


The recipe for this rhubarb syrup is perfect to make even after the rhubarb season a delicious drink.

The preparation is really easy and you can enjoy the great rhubarb flavor all year round. No matter if you pour some of it into water, or make it into a delicious cocktail, the syrup is good for everything. However, you need to preserv it for a longer shelf life. But that’s not much work.


Incidentally, I read about the rhubarb syrup from Julia von Zartbitter and Zuckersüss and had to make one myself. She also has other great recipes on her blog, drop by is worth it!

Rhubarb syrup

Zubereitungszeit 30 Minuten
Kochzeit 15 Minuten
Gesamtzeit 45 Minuten

Zutaten

  • 1 kg Rhubarb
  • 1 Pcs. organic Lemon
  • 1 Pcs. Vanilla pod
  • 750 g Sugar
  • 750 ml Water

Zubereitung

  1. Wash the rhubarb and cut off the ends. Now cut the rhubarb stalks into small pieces without peeling.

  2. Wash the lemon and rub off the skin. Now halve and squeeze the juice. Halve the Vanilla pod and scratch out the seeds.

  3. Put the rhubarb, vanilla pod and seeds, lemon juice and peel in a saucepan and mix with the sugar. Put the lid on it and let stand overnight.

  4. The next day add the water and bring to a boil. Reduce the temperature and simmer for about 15 minutes.

  5. Put the rhubarb aside and let it rest for at least 2 hours.

  6. Then pass through a very fine sieve and catch the syrup.

  7. Fill the syrup in a large bottle for immediate use and refrigerate. So it is about 14 days preserved.

    Or preserve for the shelf in small glasses/bottles.

Werbung

Newsletter

Hier gehts zum kostenlosen Reisegabel Newsletter. Damit verpasst Ihr keinen Beitrag und kein Rezept mehr.

Werbung

Affiliate Links

Alle mit einem Sternchen* oder Amazon Logo gekennzeichneten Links werden als Werbelinks (Affiliate-Links) bezeichnet. Wenn Sie also dort klicken und einkaufen, geht eine kleine Provision an uns, welche Ihren Preis natürlich nicht ändert. Mehr erfahren Sie hier.

[jetpack-related-posts]

Tagliatelle with asparagus and shrimps

Tagliatelle with asparagus and shrimps

Tagliatelle with asparagus and shrimps


Why not combine the recipe for homemade tagliatelle with asparagus and shrimp? As long as the asparagus time is, you can do it more often. So if you like homemade pasta, asparagus and shrimp, you should try this recipe.


But if you do not like one of the things, or have no time to make the pasta yourself, no problem. The recipe also tastes good with store bought pasta and without shrimps. After the asparagus season, without asparagus, the whole thing does not make so much sense. The recipe for the tagliatelle is available HERE and can be well prepared the day before. If you want more asparagus recipes, try the homemade tagliatelle or homemade tagliatelle. Both very, very delicious!


Tagliatelle with asparagus and shrimp

Zubereitungszeit 20 Minuten
Kochzeit 15 Minuten
Gesamtzeit 35 Minuten
Portionen 2 Portions

Zutaten

  • 250 g green Asparagus
  • 1 Pcs. red Onion small
  • 2 Pcs. Tomatoes
  • 2 Stalks Basil
  • 10 Pcs. Shrimps
  • 1 Tbsp. Sunflower Oil
  • 2 Tbsp. Olive Oil
  • Salt
  • Pepper
  • 50 g Parmesan

Zubereitung

  1. Tagliatelle either fresh (go to the recipe), or bought and prepared after packaging instructions.

  2. Wash the asparagus, drain and cut off the ends. Now cut the asparagus into bite-sized pieces.

  3. Peel the onion, halve and cut into rings. Wash the tomatoes, rub dry and quarter. Now remove the core and cut the flesh into strips.

  4. Pluck the basil leaves from the stalks and chop.

  5. Heat the sunflower oil in a pan and fry the shrimp from both sides. Remove the shrimps and set aside.

  6. Now put the asparagus in the pan and fry for about 2-4 minutes, depending on the thickness of the sticks. Add the onions and fry for another 4-5 minutes.

  7. Now put the shrimp, olive oil, basil and noodles in the pan and turn off the heat. Mix everything well and season with salt and pepper.

  8. Finally, grate the Parmesan and stir about 2/3 under the pasta. Then put the finished pasta on a plate and sprinkle with the remaining Parmesan.

Werbung

Newsletter

Hier gehts zum kostenlosen Reisegabel Newsletter. Damit verpasst Ihr keinen Beitrag und kein Rezept mehr.

Werbung

Affiliate Links

Alle mit einem Sternchen* oder Amazon Logo gekennzeichneten Links werden als Werbelinks (Affiliate-Links) bezeichnet. Wenn Sie also dort klicken und einkaufen, geht eine kleine Provision an uns, welche Ihren Preis natürlich nicht ändert. Mehr erfahren Sie hier.

[jetpack-related-posts]

Asparagus Flatbread

Asparagus Flatbread

Asparagus Flatbread

Try this tasty asparagus flatbread, because asparagus tastes not only pure, grilled or as a soup.
If you liked the recipe for the grilled asparagus last week, you can also try this asparagus flatbread. In the asparagus season you never can have enough recipes with asparagus.

The Flatbread dough for this version has already proven its value in the avocado flatbread, the small berry flatbread and the pumpkin flatbread and has now been suitably topped with fresh green asparagus. For the asparagus flatbread, I have simply spread a flavored sour cream under the asparagus and of course Parmesan may not be missing. It is again very nice for this recipe to have fresh asparagus almost directly from the field, like I had already in the recipe for the grilled asparagus.

Enjoy and have fun cooking.

Asparagus Flatbread


Werbung

Newsletter

Hier gehts zum kostenlosen Reisegabel Newsletter. Damit verpasst Ihr keinen Beitrag und kein Rezept mehr.

Werbung

Affiliate Links

Alle mit einem Sternchen* oder Amazon Logo gekennzeichneten Links werden als Werbelinks (Affiliate-Links) bezeichnet. Wenn Sie also dort klicken und einkaufen, geht eine kleine Provision an uns, welche Ihren Preis natürlich nicht ändert. Mehr erfahren Sie hier.

[jetpack-related-posts]

Grilled green asparagus

Grilled green asparagus

Grilled green asparagus, not just a side dish.


What could be better in the asparagus season with this beautiful weather to make a BBQ, and in addition to a great meat also some asparagus from the grill. Grilled green asparagus works as a side dish, but also as an main course. We recently had a decent portion of it with the delicious herb pull apart bread with mozzarella for dinner and no steak missing.

Although life on the land has one or the other disadvantage, such as the lack of fast internet, but you get great asparagus almost directly from the field. The asparagus farmer of trust, has super fresh asparagus and you know what you get. No asparagus that has been on the road for days and maybe sprayed with pesticides on the field, the extra cost is worth it!

The first asparagus dish for this year is super easy. You just have to prepare a few things, off to the grill and that’s it. While the asparagus is grilling, you have time to put your legs up and enjoy a glass of wine. This is free time.


Grilled green asparagus

Zubereitungszeit 5 Minuten
Kochzeit 10 Minuten
Gesamtzeit 15 Minuten
Portionen 2 Portions

Zutaten

  • 500 g green Asparagus
  • 1/2 Pcs. Organic lemon
  • 2 stalk Thyme
  • 2 clove Garlic
  • 2 Tbsp. Olive Oil
  • Salt
  • Pepper

Zubereitung

  1. Wash the asparagus, drain and cut off the ends. Wash the lemon and thyme, halve the lemon and shake the thyme dry.

  2. Press the garlic cloves flat with a knife, rub off the shell of one lemon half and then cut the half into slices.

  3. Preheat the grill and place the asparagus, garlic, slices of lemon and thyme on it. Spread approximately 2 tablespoons of the olive oil over it and then grill the asparagus with not too much heat.

  4. Just before the end, add the remaining olive oil and the lemon zest and season with salt and pepper.

Werbung

Newsletter

Hier gehts zum kostenlosen Reisegabel Newsletter. Damit verpasst Ihr keinen Beitrag und kein Rezept mehr.

Werbung

Affiliate Links

Alle mit einem Sternchen* oder Amazon Logo gekennzeichneten Links werden als Werbelinks (Affiliate-Links) bezeichnet. Wenn Sie also dort klicken und einkaufen, geht eine kleine Provision an uns, welche Ihren Preis natürlich nicht ändert. Mehr erfahren Sie hier.

[jetpack-related-posts]